Well, to those of you hoping for more pictures of people building... sorry! Friday was very productive, but we didn't have the camera with us. Saturday morning found only Andy and Chris out at the house site, and we weren't about to put work on hold to pose for the camera. Maybe next week.
On Friday morning, we assembled the two final loft bents and set them in place toward the South end of the house. The rest of the day was spent on the loft floor. Andy and Roger, a friend from church, worked on the loft, while Chris hung out in the living room and cut the flooring pieces to order. After Mindy dropped Eli off at a friend's house for a play date, she joined Andy on the loft floor for several hours. The more family we have working on the house, the better. It was nice to have Mindy out for most of the afternoon. We had a reasonably smooth system, and we made good headway. As some other days have gone, we didn't really get into our best rhythm until near the end of the day.
The view from the North side of the house. Under the loft at this end will be a closet and a bathroom. For now. We'll see if things change much as we continue.
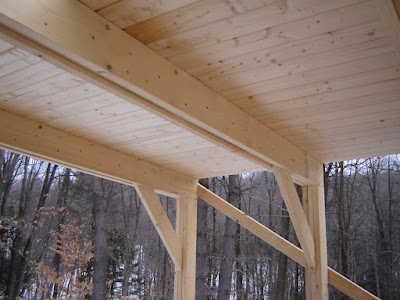
The ceiling above the North bathroom. You can see how we inset part of the joists in this photo. The 2x4 between the 2x8s could be flush with the other boards, but we like the inset look. We changed the measurements from the plans and inset ours by about an inch. You can see at the ends of the joists that the small section of 2x4 past the knee brace is flush.
First thing Saturday morning. A beautiful day, partly sunny and in the upper teens. This side of the house under the loft will be the dining room. We're planning a table of monolithic proportions.
The usual view... that I forgot to take until after the tarps were so neatly laid out. We'll get another photo this week showing all the exposed framework, but for now, this is how it looks.
Saturday, January 26, 2008
Saturday, January 19, 2008
The Camp
Ahh... home sweet home! This is where Karen and Chris lived when we first moved to Massachusetts. The stones in front of the tent were important to Karen - she wanted somewhere off the ground to keep her shoes. Note the spacious, walk in closet. :)
This is the big tent. With three rooms, there proved to be plenty of space for Andy, Mindy, and their three boys.Sometimes nature makes a local call. The shower rock proved to be ideal for its purpose, and we enjoyed the most wonderful showers standing on it in 40 degree evenings. Secured to a tree above the rock is a solar shower bag. It held 5 gallons of water, and more importantly, had a small shower head. With a maximum of 5 gallons for four showers, we all got in the practice of lathering up with cold water from the blue container, then rinsing with the warm water under the shower. We heated the shower water on the propane camp stove, so even though it was pretty short, it really was a perfect end to a tough day of clearing land.
This is a good view of the kitchen against the hill and the dining room inside the screen tent. We had company on this day, and you can see two chickens roasting on the spit that we had a lot of fun making. That's Mindy and the boys in the picture, relaxing on a lovely spring day.
We cleared, turned over, and planted a lovely garden about 30 yards from the tents. It showed great promise for a few weeks, but was eventually done in by the acidic soil and the attacks of acid-friendly local plants. The final harvest consisted of a few tiny carrots and some beans. Or peas. I can't quite recall.
Despite not having jobs, homes, or as some would suggest, a clue, we really loved our time in the woods. It wasn't all rainbows and sunshine, of course, but we built lasting memories and really bonded with each other and the land itself.
The Loft Bents
As much as we love the floor, we are very glad to be past that step. We put up one bent on Friday night, and started Saturday with a good handle on how to put the remaining bents together.
Eli thought that his Uncle Chris needed some help hitting the nail. In the background are quite a few visitors. Chris volunteers with a Boy Scout Troop from our Church, and they camped out at the land on Friday night. Several of them stayed to help with the work on Saturday, and had a good time nailing the bents together and lifting them into place with us. This picture also serves as a good display of the internal structure of the loft bents.
Lifting a heavy bent into place.
By dusk on Saturday, we had eight of the ten bents assembled and in place. It would have gone faster if we hadn't paused after each bent to say "wow... that looks great!"
Same time, different angle. We cleaned up the deck a bit, moved the sawhorses into the future dining room to give us space to put up the final bents on Monday, and threw tarps over everything we could. Except for the 2x4 coming down at an angle from the Northern and nearest bent, nothing else is attached by nails. The tenons of the center 2x6 in the posts settle right into the floor, and the two outside 2x6s in the posts settle onto the shoulder of the deck. Everything is tight and solid, even without external support. We braced it all to keep it straight until we return on Monday, but we were quite impressed with how strong everything feels.
Saturday, January 12, 2008
The Final Floorboards
Apparently we like to work in a mess. Wow! When we're busy making progress, I guess we don't mind what gets left behind in the dust. We finished up the last few boards of the main floor today. This part of the house is the mudroom on the North wall and the kitchen and main entry along the West wall all the way down to the South wall.
More mess.
The finished floor! Well, mostly. We had a lot of helping hands as we finished nailing down the last few boards, and some family from out of town made their first visit to the land just as we finished up. From left to right... Ethan, Gary (on Ben's back), Ben, Eli, Hannah (in the foreground), Benson, Robin, Andy, Mindy, and Karen. Chris is taking the picture. Quite the crew!
On another note... wouldn't a swimming pool look great right where the tarp is laying?
Tuesday, January 8, 2008
The Flooring
Our house will not have a traditional sub-floor with a finished wood floor on top of that. Instead, our floor will be one material to meet all requirements - structural, aesthetic, etc. The 2x6 tongue and groove pine looks easy enough to work with, but it's really taken us some time to get it down. More work than we expected, that's for sure.
January 8 was a gorgeous April day, with temps near 60, the stream rushing in the background, and sunshine all day long. Andy and Chris finished quite a few boards today, with Mindy and two boys showing up for a little while with lunch and a few helping hands.
You can see the rough hole for the stairs, and the overhang of the planks on the North and South walls. We'll trim all of that up later with the circular saw. It's much more efficient to cut one straight line than a lot of little cuts.
This is how the ceilings will look from the lower level and the dining room. The chamfer is a great touch.
Flat floor, a few holes for the future posts that will support the next level, some stacked flooring waiting to be nailed down, and in the foreground you can see the bow wrench. We use this to pull any wayward boards straight. It keeps the flooring nice and snug.
Later in the day, though we did complete a few more courses of planks before we threw the tarps over it all for the night.
No winter boots on this January day! We spent most of the day barefoot and in T-shirts. Perfect building weather, and way too early for bugs.
Wednesday, January 2, 2008
The Backfill
The South wall has been backfilled at this point, and oh is it nice! This makes the house so much more accessible, and much simpler to work on.
Backfilling along the side of the house while we aligned the posts and joists of the lower level. The nine loads of sand and the enormous excavator were just a few of the distractions during the day.
Looking toward the South of the house, you can really see how the slope of our land works well with the Canadian design. We have two short posts to put up, then the three South-most joists.
Nicely settled, with all the backfill in, most of the posts aligned and nailed in place, and, of course, the Subaru in the foreground, which makes our house look pretty tiny. The egress window on the North wall of the house really shows well in this photo, and I think, code willing, I'd like a set of round shutters on that window, sort of hobbity.
Another shot showing the backfill and the natural slope of the land. We're absolutely thrilled with the house placement on the site and how settled the Canadian model looks there. It's a fantastic design, and we're really looking forward to seeing it go up.
The Alignment of the Lower Level
After lifting all the joists into place on one day and throwing tarps over everything, we started the next day with high hopes. It ended up taking us the entire day to square and align all of the posts and joists. We had a lot of distractions that day, and a lot of help, which made for some slower progress than we expected.
This view is looking over the South wall into the lower level. The foundation wall is 30' away, and as you can see, we will have excellent light during the low sun winter months. That will heat up our slab very well, as well as look and feel great.
Nailing some joists in place. Note that not everything is measured and in place yet, so if some of these angles seem off, don't worry - we made sure they were correct before we hammered any nails. This angle provides a good view of the building pattern of the joists.
The Plans
As requested by Sean Kelly, whose family is also building a Canadian FirstDay, here are the plans for our house. The footprint is 30' x 36'. You can see on the main page how the South wall will look with finished windows, and also how the loft will overlook the kitchen and living room.
This is the main level, and will be as open as we can make it, with a large kitchen and island area, dining room, and living room.
The lower level will have a radiant floor from www.radiantec.com which should keep the area very comfortable. Andy and Mindy's three boys will share the large bedroom on the North wall, and we have some good ideas to make that a pretty neat space for them.
The loft level will hold an additional bedroom on the North side, and the rest will be open, overlooking the living room on the East and the kitchen on the West. Chris would like a fire pole to slide down from the loft to the living room, but unfortunately has been outvoted.
Tuesday, January 1, 2008
The Lower Level Posts
The first two walls in the basement went up very nicely. The building process was broken down into several steps; lay the pressure treated boards on the interior footings, assemble the posts with a series of 2x6s cut to specified lengths, attach a 2x6 plate to the tops of the posts, then raise the wall into place. The wall stood on its own, then we used sawhorses as scaffolding as we lifted the joists into place. The joists are 2x8s sandwiching a 2x4, and rest on the interior wall and the sill plate. On the ends of the two short walls, you can see a 2x6 cut longer than the rest. This allows the joist to settle onto it, essentially making a mortise and tenon joint out of dimensional lumber. It's a beautifully strong and simple way to build.
Here are a few of the posts for the West walls. They were built on prior days with everybody helping, and then Andy and Chris assembled the walls and joists on one day. One day of freezing rain, when nobody else wanted to help. Who could blame them?
The distance shot from the cherry tree, with the familiar sight of Andy's Subaru in the foreground. Without his Forester, our tools would all be stuck at the driveway entrance, some 750' away from the house.
Once we had the hang of things with the first wall, we kept going, laying tarps as soon as we could to stay out of the rain. At the end of the day, we had a 1,000 sq. ft. tent, supported by all of the basement framework. When you let your kids make blanket forts when they're little, I guess they never stop!
If this looks nasty and cold to you, you're right. This is how we left things after raising the basement walls that day.
The Sill
A gorgeous day, with a lot of work ahead of us - we wanted to tar the foundation, then start laying the sill plates in place.
We kept the tar in the car... or should I say... the tah in the cah, to stay warm and usable, and got busy with brushes and spackling blades. It was 25 degrees out, and by the bottom of the 5 gallon tar buckets the tar was pretty thick, but even so, I don't think any temperature or condition could make that job fun. What a slow, sticky, experience!
Laying the sill plates involved a lot of measuring. The sill plates rest on sill seal, a wide strip of closed cell foam, and is bolted to the foundation through bolts that were poured into the concrete. Simple theory, and not too bad to do on the South wall, which is only 4' tall. The other walls haven't yet been backfilled, and proved to be more of a challenge.
By the end of the day, we had the tar done and half the sills in place.
With such an early sunset this time of year, we often use a gas lantern or two to extend our working hours. We're laying the sills on the North wall here, and with no backfill, it proved to be a tricky balancing act. The roll on the wall is the sill sealer foam.
Subscribe to:
Posts (Atom)